Network

Unity Asset Store Downloads to Dropbox

Unity3DandDropbox

Dealing with 3rd party packages offered through Unity3d’s asset store across multiple computers, it can be a bit of hassle. When you download the package through asset manager it stores it in your Windows users folder. Then when you import it into your project is pulls it from this same location. But if you’re already syncing your multiple computers like I do (my work system and home system) for projects it is frustrating to find that the packages I downloaded or updated at work, are not the same as now when I get home. The solution, create a symbolic link to a shared dropbox folder just like we did in the article One Dropbox to Rule them All.

Unity3d as of 5 and 2017.1 stores the asset downloads by default in:

\\Users\<User Name>\AppData\Unity\Asset Store-5.x\


In my dropbox folder I created a folder at:

\\Dropbox \Asset Store-5.x

I then copy the contents at the Users folder to my Dropbox folder location and then delete that folder in Users.

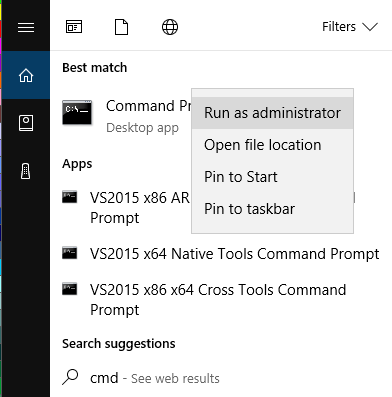
Open your command window box in administration mode by typing in the taskbar searchbox “cmd”. Then when it lists Command Prompt at the top right click on it and select “Run as administrator”.

Then I create a symbolic link from Users to my dropbox location that looks something like this.

mklink /j "C:\Users\<User Name>\AppData\Roaming\Unity\Asset Store-5.x" "C: \Dropbox \Asset Store-5.x"

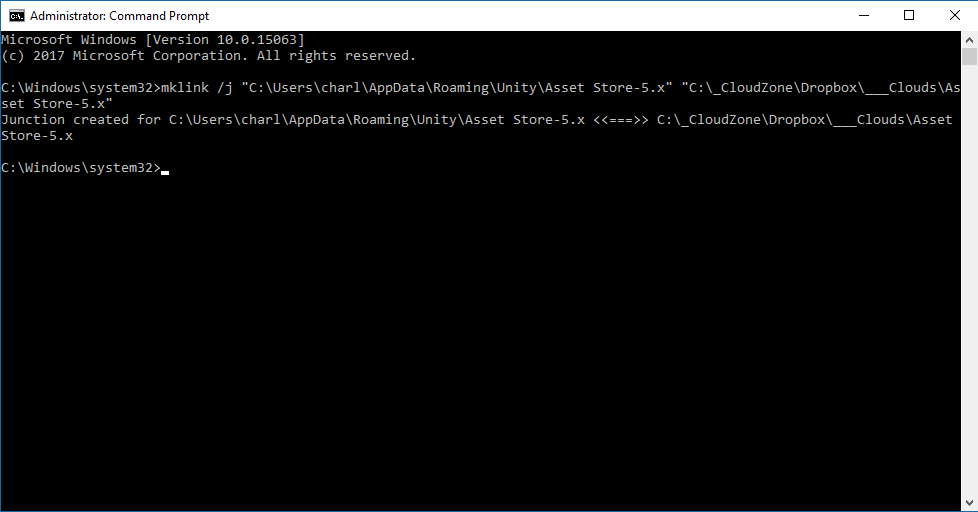
Your cmd box will output something similar to this:

Now do the same on your other computers and when you download or update a package from Unity’s asset store it will sync across all your computers. This can also be a great way to move your Unity’s Asset Download location to another drive location if you find your main storage device getting full.


The following is for my personal use when performing this task.

mklink /j "C:\Users\&lt;User Name&gt;\AppData\Roaming\Unity\Asset Store-5.x" "C:\_CloudZone\Dropbox\___Clouds\Asset Store-5.x"

XAMPP Blocked by W3PS on Windows 10

When trying to run XAMPP (a local web an PHP service) on my newly upgraded windows 10 machine I was tetting getting the following message:

(OS 10013) An attempt was made to access a socket in a way forbidden by its access permissions. : make_sock: cound not bind to address [::]:80
(OS 10013) An attempt was made to access a socket in a way forbidden by its access permissions. : make_sock: could not bind to address 0.0.0.0:80
no listening sockets available, shutting down
unable to open logs

xampp_windows10_socket_error

The problem is the installed IIS coponent World Wide Web Publishing Service (W3PS), which allows the computer accept HTTP requests and host pages like XAMPP does. Running this service blocks other programs from having access to port 80. To fix this problem you just need to disable the service. Here is the procedure.


In the windows 10 search box type in "Service" and click on "View Local Services".

windows_10_services_world_wide_web_publishing_service


Find and right click on "World Wide Web Publishing Service" and select "Properties".

world_wide_web_publishing_service_properties


Click on "Stop" and wait for it to stop the service.


On the startup type pulldown select "Manual" and click "Apply" then click on "Ok".

After the W3PS service is disabled you should now be able to start XAMPP normally. Happy XAMPPing 🙂

Sharing FireFox Multiple User Profiles On Dropbox

DropBox FireFox

I love that FireFox allows you to have multiple user accounts using the user profile manager. If I need to login to one of my social profiles like Twitter as several different users at once I start up multiple instances of FireFox each using different profiles. However I find myself sometimes needing to login to these different profiles on different computers so the solution is to share their profiles through DropBox.

If you haven’t setup a shortcut for launching FireFox User Profiles see: Shortcut to Quick Launch FireFox User Profiles

Begin by closing all instances of FireFox.

Step 1 (Copy FireFox Folder to DropBox)

FireFox data and profiles are located in windows at: C:\Users\Master\AppData\Roaming\Mozilla\FireFox

Start by copying this directory to your DropBox. In this example we will assume your DropBox is at C:\DropBox

When done copying the folder should be in DropBox like so: C:\DropBox\FireFox

Step 2 (Rename original FireFox folder)

Rename your FireFox directory at C:\Users\Master\AppData\Roaming\Mozilla\FireFox to C:\Users\Master\AppData\Roaming\Mozilla\FireFoxBackup

Step 3 (Create Junction Link to DropBox location of FireFox)

1. If you aren’t already login to Windows 7 or 8 as an administrator
2. Goto \Windows\System32 and locate cmd.exe, right click on it and select “Run as administrator”
3. Change Directory to your FireFox location:
a. cd C:\Users\Master\AppData\Roaming\Mozilla
4. Make a junction for FireFox to the copied location on DropBox
a. Mklink /J FireFox C:\DropBox\Firefox

Test

Run FireFox as normal and make sure it works. Is it slow? Of course what did you expect.

Deploy across other computers

Now repeat Step 3 on all the other computers you want to share the same FF profiles with. You will need to install FireFox on those computers if you haven’t done so already.

Shortcut to Quick Launch FireFox User Profiles

ffx

FireFox allows you to run multiple User Profiles at once. This is great if you want to be logged into many social profile accounts at once, such as Google, Facebook, Twitter you name it. Usually you can only be logged into each of these one time. Even if you ran your browser multiple times you would still be forced to logout as one profile and login as another.
However with FireFox you can have multiple instances of the browser open and logged into different accounts all at the same time. By default this is not really the case, you need to create a shortcut to your FireFox program with some special tags to allow it to behave like this.
1. Start by right clicking on your windows desktop and selecting > New > Shortcut
2. When it asks you to type in the location of the item enter:

"C:\Mozilla Firefox\firefox.exe" -profilemanager -no-remote

Assuming FireFox is installed in C:\Mozilla FireFox (change as necessary.)
3. Hit next and enter the name for the shortcut.
Now launch FF and it should come up with the Choose User Profile manager.

XAMPP shared on DropBox and LAN

One DropBox to Rule them All

dropbox

DropBox and other Cloud drive services are great for getting your files from one machine to another. However the caveat is that every time you update a file in your DropBox then it has to resync with all the other computers across the Internet. This can be kind of slow and eats up your bandwidth.

If you have multiple computers on a local network you can share the DropBox folder.

Setup one computer to have your DropBox folder. Then share that folder on your network. In windows you can map the drive or even setup a full junction point.

Say you install a program directly to your DropBox folder and it requires a specific path to run. Mapping the drive or setting up shortcuts won’t fix the problem with launching the program properly on your other computers.

1. Login to Windows 7 or 8 as an administrator on the networked computer (not the one with dropbox)
2. Goto \Windows\System32 and locate cmd.exe, right click on it and select “Run as administrator”
3. In the command window enter:


C:\> mklink /J “C:\DropBox” “\\COMPUTERNAME\DropBox”

In the above example COMPUTERNAME is the name of the computer on the network that has DropBox installed at C:\DropBox and that folder is shared.
So now there is a Junction link on your other computer that will call DropBox and treat it and any programs on it as if it was running from the same location on the other machine.

Note: Just because you created a junction link sharing your program across the network doesn’t mean it will run in every instance, you may find you still need to install it on the other computer and give it the install path of the original through the junction link you created. Also keep in mind installing like this may make you loose data on the source system location so back it up first!

Symbolic Linking Directories on Windows

mklink

It is great to finally see a real effective symbolic link implemented as a standard option in the latest Windows 7 and up. If you have experience with unix or linux systems you may already know all about symbolic links. If not, a symbolic link is a way of telling the computers operating system that a file path points to a different location. This is useful when dealing with compatibility or access problems with programs such as unchangeable or default install locations of programs that are too problematic to actually reinstall in the new location or for some reason impossible to change. This method will help standardized file path conflicts.

When you create a symbolic link the “new folder” will point to the “source folder”. This will allow you to access files in the source folder through the new folder path and the computer will not try and correct it, it will believe the files actually are located through the new folder path, but in reality they will be affecting those in the original source folder.

1. Login to Windows 7 or 8 as an administrator
2. Goto \Windows\System32 and locate cmd.exe, right click on it and select “Run as administrator”
3. In the command window you will enter the command to create the symbolic link between the two directories like so.


C:\> mklink /D “C:\NEWFOLDER” “C:\SOURCEFOLDER”

Now if you open your computer folders and goto C: (or whatever location you did this at) you will see the folder C:\NEWFOLDER you will also notice a little arrow in the bottom left of the icon indicating this is a symbolic link (not to be mistaken by a shortcut).

Note on shortcuts: A shortcut will resolve to the source folder unlike symbolic links which resolve directly through the path of the symbolic link. So shortcuts don’t have the ability to correct path conflicts in most instances like this method will.

Mklink /D (symbolic link) vs /J (junction)

In the above example we used /D to make a symbolic link, however it must be noted that a symbolic link for a directory only works if the new folder and source folder exist on the same partition. If you want to make a symbolic link across partitions, drives, shared network drives-then you must a junkction. Simply replace the option /D to /J in the example above.