Code Slinger

Computer hardware is great and I have lots of it as the owner of a computer company. However when you want that cold plastic composite and metal thingy to do something...you need code.

Code Projects
  • Code Projects in C++,C#,PHP,Java

    Code Projects in C++,C#,PHP,Java

  • Future Tech

    Future Tech

X-NLP

X-NLP

Extreme Natural Language Processing.
Read More
Data Bots

Data Bots

Internet Bots for Crawling, Scraping and Data Mining
Read More
Vid Automatic

Vid Automatic

Creating rich real time video products and streaming services.
Read More
VR Hacker

VR Hacker

The Hacking of Virtual Reality with the Oculus Rift.
Read More

FacePop: A New Extension for Face Processing in Stable Diffusion Web UI

Hey there! I’m excited to finally share something I’ve been working on — FacePop, my brand-new extension for AUTOMATIC1111’s Stable Diffusion Web UI. If you’ve been looking for a way to take control of face detection and enhancement in your images, this tool might just be what you’re looking for. I created it as a better solution to some of the limitations in the current tools, like Zoom Enhancer, and it’s packed with cool features that give you way more control over facial enhancement in your images.

So what is FacePop exactly, and why did I create it? Well, if you’ve ever worked with Stable Diffusion, you know that while the image generation is great, sometimes the faces just don’t come out quite right. This is where FacePop comes in. It’s designed to detect faces in an image, crop them, upscale them, enhance them with some nifty processing tricks, and then seamlessly blend them back into the main image. It’s like giving the faces in your images a personal makeover!

Why I Built FacePop

Initially, I used Zoom Enhancer to zoom in on faces and fix the quality, but I found myself wanting more control. I also wanted to integrate with some other great plugins like ControlNet, ReActor, and After Detailer. FacePop lets you do all that and more, without needing to rely on other extensions like Unprompted.

Basically, I wanted a way to get faces in my images looking as good as possible, but I didn’t want to jump through hoops or have a ton of separate tools cluttering up my workflow. With FacePop, everything’s built-in and ready to go.

How Does FacePop Work?

Here’s a quick breakdown of what FacePop does:

  1. Detect Faces: It accurately detects faces in the image using Mediapipe. Once the faces are found, it identifies key facial landmarks to make sure everything is aligned.
  2. Crop & Upscale: The tool crops out the faces, scales them up (with padding if you want), and gets them ready for processing.
  3. Enhance the Faces: Each face gets processed separately — you can do things like color correction, sharpening, background removal using MODNet, and more.
  4. Mask & Blend: After processing, it creates a mask around the faces and blends them back into the original image. This means no awkward edges or mismatches.
  5. Final Touches: Once the faces are placed back in, the whole image gets processed again for any final tweaks or adjustments.

The best part? You can fine-tune everything! From face width and height to padding and detection confidence, it’s all in your hands.

Why Should You Care?

Whether you’re a digital artist, photographer, or just someone who loves generating images, you’ve probably run into situations where the faces in your artwork just didn’t look quite right. FacePop fixes that. You don’t have to manually touch up every image anymore — just let the tool handle it.

It’s also integrated with ControlNet for advanced manipulation, and it’s designed to play nicely with popular tools like ReActor and After Detailer, giving you the flexibility to enhance faces while still maintaining creative control.

Easy to Use

FacePop is super easy to install and use. If you’ve got the Stable Diffusion Web UI set up already, installing this extension is a breeze. Just grab it from the Extensions tab using the URL:

https://github.com/TheCodeSlinger/FacePop.git

Once it’s installed, you can access all its features directly in the Img2Img interface, where you’ll find a ton of options for tweaking and customizing how faces are processed.

What’s Next?

I’m planning to keep improving FacePop and add more features based on user feedback. So if you try it out and have ideas for improvements, hit me up! There’s a lot of potential to keep pushing this tool further, especially as more people start using it in different workflows.

So, if you’re tired of low-quality faces in your Stable Diffusion images or just want more control over how faces are enhanced, FacePop might be the tool you’ve been waiting for. Download it, give it a spin, and let me know what you think!


That’s it for now! I’m super excited to see what you all do with FacePop and how it fits into your creative process. Stay tuned for updates and feel free to share your results or any feedback. Happy generating!

Cheers!

Unity3D Refraction Transparency Z-buffering Ghosting Issue

I’m posting this just to supply an image to the Unity3d forums of the issue when using refraction shaders with transparent materials. The refraction process in this scene is to mimic underwater FX. However it seems to apply the effect before getting to the transparency Z-buffer part, because I guess transparent objects need to be done last? Anyhow, it causes the transparent objects to ghost, or be shown offset from what they should be as the refraction shifts the objects to a new location but not if it is transparent. This seems to be a common issue with any refraction based shader as I have tried a few and they all do the same thing.

So my solution is to turn off the refraction setting in the underwater system and apply flag style distortion script to the main camera, which gets it looking pretty close to the refraction method but without the transparency ghosting issue.

Under The Sea Daze

Of course I never live up to my New Year Resolutions and haven’t contributed to this blog in a while. I just get too damned wrapped up in my projects and stuff going on. I also easily get sidetracked into other projects. Like this one, a visual screen saver concept that is to go with the new Junior Desktop for children friendly Kiosk systems. This is a personal journal entry in my blog to go over the project, what it is about, my goals and solutions.

Building on the framework for the Windows Screen Savers which supports multi-monitor configurations. This image above shows a panorama view of the program spanning across 3 displays.

I had made lots of screen savers in 2017, I basically spent that entire year tweaking the engine and coming up with new concepts for screen savers to add to my site WindowsScreenSavers.com. It had always been a goal, since I started that project, to make an aquarium version. I will admit that it isn’t as visually beautiful as some of the others, nor does it really compete with the video versions of similar aquatic screen savers, but what it does have is character.

Every day there is something new to be witnessed in this program. Special holidays included, like Christmas, Easter, Halloween, and Columbus Day. Not just those major holidays but obscure ones I didn’t even know existed until I began researching this project. Such as Popcorn Day, the Ides of March, Submarine Day, Goth Day, Kite Day, Ask a Stupid Question Day. The list was daunting, but I have finally closed in to near to handful of the last ones and the end is in sight.

A lot of the assets I had or were easily obtained through Unit’s Asset store or places like TurboSquid. However as I added more assets to the project the file size grew, and grew and when it peaked 1.5 Gigs I knew I needed to reign this madness in. Using tools like Rhino 3D I decimated the meshes taking some like the bust of George Washington from over a 300,000 vertices down to 52,000 (and I could probably crunch that more with little loss of detail.) Then I had to crunch the texture maps, because there was a ton of them and a high quality map of 2048×2048 usually resulted in eating up over 2.7 MB. When you consider most material texture requires a Color Map, Normal Map and often Occlusion and Metallic map all at 2048×2048 that one material is then eating up 10 MP of space. So crunch crunch crunch down to 256 or 512, or if it is close to the camera and the detail is needed it got to be 1024×1024. I also would ditch the occlusion and often the metallic maps. Eventually I got the entire thing down to just under 450 GB. Not bad, more than 60% reduction in space required and more importantly it will fit on CD-R media disc for easier distribution. Of course there will be a download option too.

I created a lot of the models and fish skins myself using Rhino 3D, Corel Draw and Substance Painter. Yeah I have the Adobe Suite with Photoshop, but my god it just too bulky and clumsy to use unless absolutely needed, and it is sometimes, especially when assets come with textures in PSD format, stop that people…just STOP! Use PNG or TGA!

As this project winds up, my son Nick is bugging me to finish work on another project we had dabbled on while in Breckinridge skiing for a week, The Boom Game. That one I’ll write up another journal on I would imagine. I just hope it doesn’t take as much time as this one did, 3 months so far. I also have my major project the dungeon crawl game which was coming along well and looking amazing when it got put on hold to do this silly thing. Ok it’s not silly, I hope it will help drive the new Kid Computers site. Let’s face it hardware is dead, I have to re-energize that company with software solutions.

That’s about it for now. Hopefully I will post again before 2020. HAHAHAHA.

Unity Asset Store Downloads to Dropbox

Unity3DandDropbox

Dealing with 3rd party packages offered through Unity3d’s asset store across multiple computers, it can be a bit of hassle. When you download the package through asset manager it stores it in your Windows users folder. Then when you import it into your project is pulls it from this same location. But if you’re already syncing your multiple computers like I do (my work system and home system) for projects it is frustrating to find that the packages I downloaded or updated at work, are not the same as now when I get home. The solution, create a symbolic link to a shared dropbox folder just like we did in the article One Dropbox to Rule them All.

Unity3d as of 5 and 2017.1 stores the asset downloads by default in:

\\Users\<User Name>\AppData\Unity\Asset Store-5.x\


In my dropbox folder I created a folder at:

\\Dropbox \Asset Store-5.x

I then copy the contents at the Users folder to my Dropbox folder location and then delete that folder in Users.

Open your command window box in administration mode by typing in the taskbar searchbox “cmd”. Then when it lists Command Prompt at the top right click on it and select “Run as administrator”.

Then I create a symbolic link from Users to my dropbox location that looks something like this.

mklink /j "C:\Users\<User Name>\AppData\Roaming\Unity\Asset Store-5.x" "C: \Dropbox \Asset Store-5.x"

Your cmd box will output something similar to this:

Now do the same on your other computers and when you download or update a package from Unity’s asset store it will sync across all your computers. This can also be a great way to move your Unity’s Asset Download location to another drive location if you find your main storage device getting full.


The following is for my personal use when performing this task.

mklink /j "C:\Users\&lt;User Name&gt;\AppData\Roaming\Unity\Asset Store-5.x" "C:\_CloudZone\Dropbox\___Clouds\Asset Store-5.x"

Attack Hoaxers and Fakers for Profit and Click Herding (DEBUNKED)

On June 3rd 2017, reports came out of a van running over people on London bridge and then three men getting out and stabbing people. Eyewitnesses said the men were all Muslim and shouting to people as they stabbed them “This is for Allah.” This is just the latest in many such events happening across the world by fundamentalists and extremists, especially when talking about the Islamic extremism.   However as with the stabbings in Portland metro man who stabbed and killed two nom Muslim men for defending a Muslim woman, the hatred and violence is not limited to just one side. Regardless of the situation, there is a disturbing trend within online media of labeling every incident as “Fake”, “Hoax” and “False Flag”.

At a time when the US President often calls news agencies he does not agree with “Fake News.” A culture of discrediting an opposing side by calling it fake has risen up in online communities with an astonishing vigor. Party lines and ideological lines both share this mentality of a trying to tear down arguments of one side or the other as fakery.  One just has to view the news to or visit any scientific debate to hear the rhetoric, from political, the Apollo moon landings, to the theory of evolution. Anything people disagree with to any extent has online propaganda targeting it as fake.

When it comes to acts of violence it is now assured every instant will have a social media voice speak out and call it fake and a false flag attack. Everything now has its own conspiracy following and movement behind it, and the latest events in London are no exception. However what seems to be new in my perspective is that the Islamic community are now embracing and propagating these events as conspiracy false flags against them, in order for the governments to garner support and justify discrimination and anti-Muslim political agendas.

Conspiracies have a strong appeal to some people, probably ever since the JFK assassination there has been a pop cultural demand to find a deeper secret then what the mainstream media gives. JFK was probably the biggest conspiracy theory event up until 911, which then sparked more conspiracy theories and criticism then any other event in history. Many films, documentaries, books, articles and an untold number of blogs and social medial shares have circulated about various 911 false flag and conspiracies.

The most famous film series about the 911 attacks is probably Loose Change, produced from 2005 to 2009. The film makes many conspiracy claims relating to aspects of the events on September 11. Some of the talking points in the films make sense, but others fall flat and are easily discredited or have been debunked. It makes one wonder what was the actual goal? The original version was produced for only $2000 US dollars and was released for free. A 2nd edition was produced for $6000 and was released on DVD. Reports are most of the copies were given away, but at least 50,000 were sold. Amazon currently sales and rents the movie with the online streaming services for a charge of $9.99 to buy. If the price for the original DVD was the same, and we assume a modest net profit margin of 50% then that would have still produced at least a profit of a quarter of a million dollars for a $6000 dollar investment.

I’m not going to assume that the intent of the original iteration of the Loose Change films was profit motivated. The author Dylan Avery made it on his laptop and probably was convinced himself his arguments were good, but many points would later be debunked by various sources and enthusiasts. However in the end the film was remade and did produce a considerable amount of profit for the developer and producers and I think helped spark culture that is vulnerable to the notion of Deep Conspiracy.

Now we come to the latest in a tidal wave of violent attacks since 911 and I have been witnessing an ever increasing barrage of videos and articles that each latest attack was fake. These content makers often associate the event as being a false flag by the government or some organization. From Freemasons, to the Bilderberg Group, to the Illuminati, Israel, the CIA, NSA, FBI, NASA and the New World Order, have been pointed to as the puppet masters behind every new violent event that occurs. Finger pointing towards groups that are secretive or not well known, and or people already have some criticism towards are easy marks for false flaggers to point at.

This conspiracy message then floods the comment sections of the mainstream media agencies that first report the news and those outlets that re-circulate press releases. Often the conspiracy comments outnumber the other comments and many are supported by like minded responses and likes driving the narrative of the comments section to be strictly one sided towards the conspiracy theories. Questioning or attempting to counter the claims on the comments often leads to being berated by the false flaggers for criticizing their claims.

What about the latest London attack on June 3rd 2017? Within hours of the news agency reporting the news the false flaggers were already churning out content in attempts to prove it was a hoax. The primary claim comes from a photo of a dead terrorist and comparing it to a video of police officers changing on the street after responding to the scene.

These pictures are from one of the false flaggers YouTube videos that makes the claim the police officers staged the false massacre. They claim that the police officers in the video are getting dressed to in the clothes worn by the terrorists in order to pose for the media.

In this final screenshot of the video we see the creator has made a composite of the two sources and put them side by side and then noted the hair, the ammo pants and t-shirt and claims they are the same. The police officer changing into his clothes on the right and the dead terrorist on the left. They are not the same, clearly! They are similar but they are not the same. Every aspect of the similarities noted by the creator are clearly not the same when looked at closely.

If it is so obvious these two are not the same then why would the creator of this false flag video make such a ridiculous claim? Fame? Profit? Hubris? Misinformation? All the above? Often just a bit of analysis and research and one can find holes in these false flag claims. The problem is that the ones that point out the flaws are in a minority to the overwhelming number of those supporting and spreading the misinformation. The hoax is that that those claiming the event to be a hoax, are they themselves the ones making the hoax and creating the fakery.

Hoaxes for Profit

There are many ways to profit off of online media. YouTube allows channels to place advertising in the creators videos to earn money. The creator can also add links to affiliate sources to get money when someone clicks on a link from the article or video description. Large channels and faker names have gained millions of followers and can gain revenue from peddling t-shirts, coffee mugs and other branded merchandise. If you can get enough people to watch your video or share your article or go to your web page you can always make money.

Considering the cultural appeal for conspiracies and the profits large numbers of visitors can generate, it is no wonder that every event is quickly turned into a hoax and false flag. It’s about the money. Every event is sure to create a spike in revenue for these sources, but they can only capitalize on it if they can create a narrative of conspiracy, because that is what they do and what their visitors are looking for. Never do these sources call out such an event as, it just happened the way it was reported. There is ALWAYS a deeper secret cover-up.

I find this sickening, as in the case with such events where such tragedy has cost the lives of innocent people. That there then large numbers of profiteers that seek to not only capitalize off the death and grief of others, but to rub salt in the wound they make claims the people who died were not even real, they were actors and that nobody got hurt. One of the most disgusting of these is that of Sandy Hook Elementary. One doesn’t have go far to find the claims that the 20 children killed were not real.

Many social sites and search portals such as Google have recently been pulling advertising dollars from these sites. I’m on the fence if this is a good thing or not. My heart says “yes pull and censor them”, my head says “lets be careful on how far we go with censorship.” I think we just need to all be very critical when it comes to those claiming events to be hoaxes. See the click herding for what it really is. And we should speak up and expose the fakers whenever we can, so that others see that there is just not one side to the story. Sometimes people do mean stuff to others, no secret agenda required.

XAMPP Blocked by W3PS on Windows 10

When trying to run XAMPP (a local web an PHP service) on my newly upgraded windows 10 machine I was tetting getting the following message:

(OS 10013) An attempt was made to access a socket in a way forbidden by its access permissions. : make_sock: cound not bind to address [::]:80
(OS 10013) An attempt was made to access a socket in a way forbidden by its access permissions. : make_sock: could not bind to address 0.0.0.0:80
no listening sockets available, shutting down
unable to open logs

xampp_windows10_socket_error

The problem is the installed IIS coponent World Wide Web Publishing Service (W3PS), which allows the computer accept HTTP requests and host pages like XAMPP does. Running this service blocks other programs from having access to port 80. To fix this problem you just need to disable the service. Here is the procedure.


In the windows 10 search box type in "Service" and click on "View Local Services".

windows_10_services_world_wide_web_publishing_service


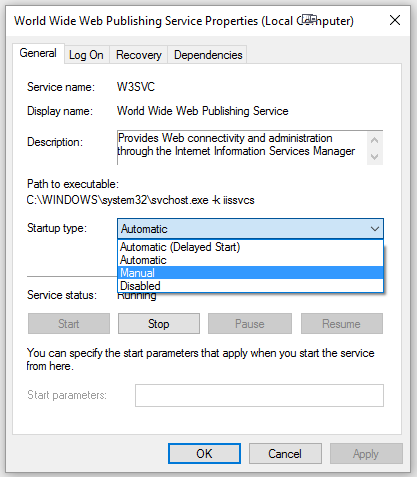
Find and right click on "World Wide Web Publishing Service" and select "Properties".

world_wide_web_publishing_service_properties


Click on "Stop" and wait for it to stop the service.


On the startup type pulldown select "Manual" and click "Apply" then click on "Ok".

After the W3PS service is disabled you should now be able to start XAMPP normally. Happy XAMPPing 🙂

My Blogging New Years Resolution for 2016

My Blogging New Years Resolution 2016

There isn’t a week that goes by, sometimes several times a day, that I am not working on a project or brainstorming that I don’t say to myself “Hey that would make a great blog article, I should writ it.” Of course as this blog site clearly shows I have neglected to take action on those statements. Usually I am more eager to dive right into whatever the idea is work on it and before long something else comes along and that idea is pushed aside.

So I am writing the article as a proclimation to myself to do better this year and dedicate at leat 1 blog a week. Each blog I write should be no shorter then 2 paragraphs in length and I should either know the subject well or spend a half our or more researching the topic before writing about it. I know that most of the blogs will revolve about what current task or project I am muddling around in at the time, which is fine. That will actually allow me to look back and see what I have been working on and the relative time frames.

Ok 2016, lets do this!

PHP CVS to MySQL

This PHP program is intended as a heavy duty automated tool for converting CSV (comma separated value) to a MySQL import file or querying it directly into a MySQL database. It can be used simply with a single static method call or with more flexibility and power by creating it as an object.

Download this CVS to MySQL from github.

It is not so trivial as one may first think to convert data from one format to another. To truly take advantage of MySQL querying of data in useful ways the data must be properly assigned a data type, such as INT, FLOAT, VARCHAR, TEXT, TIME and so on. The method implemented in this script to do this is REGEX. The regex pattern matching is leveraged to pigeon hole the data into the most appropriate type for MySQL to use. Every data entry must be scanned to detect if it is a certain type of data, a data type that maybe only integer numbers would of course become an INT type, but if even one of ten thousand entries has a decimal in it, then the entire set must become a float, double or numeric.

An INT simply converted to a VARCHAR is not very useful when trying to query data that should be an integer. The default regex rules file is “regex_mysql_data.txt” and has comment lines in it that start with the # character. You may want to go about modifying this file to fit your needs or to improve upon the matching capabilities.

Besides regex pattern matching, the data string length is also considered. This is done first to determine if that data should even be considered being compared to the regex pattern type. This is most useful for text based data to determine if it should be of types VARCHAR, TEXT, MEDIUMTEXT, LONGTEXT
Here is a simple static example to create a CSV to MySQL import.

CSVtoMySQL::ToHTML('test.csv');

All the static methods assume there is a header as the first row of the CSV file. This static method will try to detect a primary key, if it cannot determine a suitable primary key it will assign an INT at the beginning named ‘id’.

If you do not want to rely upon the auto detection of a primary key use this example:

CSVtoMySQL::ToHTMLMyKey ('test.csv', ‘MyID’);

Where “MyID” (optional) will become the name of the new primary key and no auto detection will be attempted.

-= THE STATIC METHODS =-

ToString – These static methods will display no output but only return the results as a string.

$string = CSVtoMySQL::ToString( $in_file [,$delim = ‘,’] )
$string = CSVtoMySQL::ToStringMyKey( $in_file [,$my_key = ‘id’ [,$delim = ‘,’]] )

ToFile – These methods will send the information to a file supplied as $out_file.
Null = CSVtoMySQL::ToFile( $in_file, $out_file, [$delim = ‘,’] )
Null = CSVtoMySQL::ToFileMyKey( $in_file, $out_file [,$my_key = ‘id’, [$delim = ‘,’]] )

ToScreen – These methods will print the mysql import information directly to the screen.

Null = CSVtoMySQL::ToScreen( $in_file [,$delim = ‘,’] )
Null = CSVtoMySQL::ToScreenMyKey( $in_file [,$my_key = ‘id’ [,$delim = ‘,’]] )

ToHTML – Like ToScreen methods but they will also add the HTML line break tag where the new line is.

Null = CSVtoMySQL::ToHTML( $in_file [,$delim = ‘,’] )
Null = CSVtoMySQL::ToHTMLMyKey( $in_file [,$my_key = ‘id’ [,$delim = ‘,’]] )

ToMySQL – These methods will use your mysql connection to send the mysql query directly to the database. You must have already connected to the mysql server and database before calling either of these methods.

Null = CSVtoMySQL::ToMySQL( $in_file [,$delim = ‘,’] )
Null = CSVtoMySQL::ToMySQLMyKey( $in_file [,$my_key = ‘id’ [,$delim = ‘,’]] )

-= CLASS USAGE =-

Creating a class object is more powerful then the static methods as there a lot of helper methods for fine tuning and debugging.

To create as an object:

$c2m = new CSVtoMySQL('test.csv');

//Then you can do something like:
$c2m->add_blank_tag('NA');
$c2m->add_blank_tag('M','PHONE');
$c2m->set_mysql_file(‘mymysql.sql’);
$c2m->detect_primary_key();
$c2m->to_file();

Here is another example where you export the CSV file and import directly to the mysql database.


<?php

require_once('CSVtoMySQL.php');

$sql = mysql_connect('xxx.xxx.xxx.xxx', 'user', 'password');
mysql_select_db('database',$sql);

$c2m = new CSVtoMySQL('test.csv');
$c2n->set_table_name(‘mytable’);
If($c2m->detect_primary_key() == false)
	{
	$c2m->add_primary_key(‘id’);
}
$c2m->to_mysql();

-= CLASS METHODS =-

The constructor:
__construct($csv, [$mysql = “mysql.sql” [,$hashead = true]])

This method loads the regex file and can be load a custom regex file.
Null = load_regex($regex_file = ”)

Reserved words are words that conflict with mysql syntax statements, such as VARCAR, INSERT, UPDATE, DATASE to prevent conflicts a rule file named “reserved_mysql_words.txt” is loaded and used to compare against the CSV header names. Any matches are renamed to prevent conflicts. You can override this file with your own using this method.
Null =load_reserved_words($f = ”)

Method to set the CSV file
Null = set_csv_file($file)

Method to set the path and name of the mysql output file, but only needed if actually creating an out file.
Null = set_mysql_file($file)

By default the CSV delimiter (data separator character) is comma “,” but there is an auto detect pass that will try and match with other common delimiters (such as |,tabs, spaces). If you need to set this manually use this method.
Null = set_delimiter($v)

Use this method to set the mysql table name, by default the table name is the name of the CSV file itself minus the extension.
Null = set_table_name($s)

When reading in CSV file line by line, the max length of each line is set to 0, which in PHP 5.1+ is unlimited to end of line. However, if you need to set this to a specific length use this method.
Null = set_max_line_length($v)

This method allows you to insert a new field that does not exist in the CSV file. $v is the name of the field, and the optional secondary value is the type which is defaulted to VARCHAR(255)
Null = add_field($v [,$type = ‘VARCHAR(255)’])

This method allows you to change the field name based on $n which can be an index number or name and $name is the new name to be given.
Bool = change_field_name($n,$name])

Use this method to set the primary key index. If $v is a number then the key is the field index, if a name it is matched against the header field name.
Bool = primary_key($v)

Like above method but only applies to the field name, not the index
Bool = primary_key_col_by_name($s)

Like above but only applies to setting the primary key by index, where the first field index = 0, not 1!
Bool = primary_key_col_by_number($n)

Add your own custom primary key with this method. This should be an INT as it will also be set to auto increment. Set the starting point of the auto increment public variable $user_primary_key_inc [ = 0]
Null = add_primary_key ([$name = ‘id’ [,$type = ‘INT’ [,$start_at = -1]]])

This method is used to try and detect which field in the CSV file should be used as the primary key. It begins with the first column and tries to match any INT or VARCHAR type that is all unique and contains no empty records. As soon as it finds one it sets that as the primary key. Also see notes in the “regex_mysql_data.txt” file. If $n is supplied it can either be a number which matches the index of the CSV column (where first column is 0, not 1) or the name of the actual column. This method retruns true if it was able to match a primary key, and false if it failed.
Bool = detect_primary_key($n = ”)

A helper method to test the types of fields detected
Null = print_types()

Same as above but outputs as HTML
Null = print_html_types()

The method to call for returning the results as a string.
String = to_string()

Send the output to the screen. I use it for when I am working in telnet or ssh
Null = to_screen()

Send the output like the to_screen() method but includes html breaks at the new line locations.
Null = to_html()

This method writes the output to a file, if you hadn’t already set the output file name you can supply it.
Bool = to_file([$file = ”])

This method sends the parsed CSV file directly to the MySQL database, you must have a connection already established (see usage above for an example.)
Bool = to_mysql()

Adds a blank tag identifier to the blank_tags array. Sometimes data will be in a CSV file that should be treated as if it were blank, such as with ‘NA’, ‘-‘, or the like. You can add global tag blanks with this method that cause this type of data to be ignored or treated as if it were empty. You can set the column field name here which apply the blank tag to just a specific column otherwise if blank it is treated globally against all columns.
Null = add_blank_tag($v [,$col = ”])

This method is ran automatically by several functions, but if you need to call it yourself you can. This method will attempt to determine the data type a column is using the “regex_mysql_data.txt” file and its rules.
Null = detect_types()

Used to try and detect if the CVS file contains a header. This is very problematic and not 100% accurate. By default the public variable $detect_header = false and must be set to true for this method to work. Otherwise it assumed there is a header. The method returns true if it detected a header and false if it did not.
Bool = detect_header($s)

-= ADDITIONAL CLASS HELPERS =-

CSVtoMySQL_DetectType is a class that is created and stored in the $regex_match_file array that contains the information from the “regex_mysql_data.txt” file.

CSVtoMySQL_FieldType is a class that is created and stored in the $fields array and contains information regard each CSV column and it’s fields.

Norton Anti-Virus Live Update Bug Causes Internet Explorer Unusable

Norton IE Bug

On Feb 20th 2015 Norton Anti-Virus live update was rolled out with a bug that has made Internet Explorer unusable for millions of users. Other browsers such as Chrome and FireFox seem to be unaffected and unless you already had one these alternatives installed it would be hard to find out any details on what is going on. How else do you download an alternative browser when your only browser doesn’t work?

The common error dump for this bug is:


Description
Faulting Application Path: C:\Program Files (x86)\Internet Explorer\iexplore.exe
Problem signature
Problem Event Name: BEX
Application Name: IEXPLORE.EXE
Application Version: 11.0.9600.17631
Application Timestamp: 54b31a70
Fault Module Name: IPSEng32.dll
Fault Module Version: 14.2.1.9
Fault Module Timestamp: 54c8223b
Exception Offset: 000c61e2
Exception Code: c0000417
Exception Data: 00000000
OS Version: 6.1.7601.2.1.0.256.48
Locale ID: 4105
Additional Information 1: 4f07
Additional Information 2: 4f072c04aa91eb87d88d7dd565652530
Additional Information 3: a15b
Additional Information 4: a15b24e56acca2f6a7c59c85b7f20aea

The file reported to be causing the error is the DLL file IPSEng32.dll part of Norton’s Identity Safe (NIS) however just turning that protection method off or uninstalling NIS does not fix the problem. The only current solution I have found is to actually fully remove the Norton product entirely.

After nearly 24 hours Norton still has yet to release a patch to fix this problem.

The community forums regarding the bug are going crazy starting with this thread Tonight’s update crashing IE11 started by Sunfox.

How High Can I get This Blog Post on Google Search?

graph

This is just a quick experiment to see where it will turn up on Google’s search results for ” How High Can I get This Blog Post on Google Search?”. It is not intended to be any kind of SEO trick or gimmick. There are no links going to it other than from this blog and I am not really trying to do any keyword stuffing either just writing a few paragraphs of whatever comes to mind.

If you have a unique title I think you can get to the top of the SERPS pretty easily. Not in all cases as on some long tail titles the engines will cherry pick a few keywords instead of using an exact match. Anyway after I post this I will add one link to the search query for the title and we can watch and see where it is and I will follow up with info in the comments section. Here goes….